Scanner Meets Torq: Streamlining Detection, Response, and Case Handling

The old-school SIEM model is bloated, pricey, and capped at low volumes like 50GB/day and it is falling behind. Tools like Scanner.dev are stepping in, managing volumes like 1TB/day with ease and speed. Rather than offering everything in one package, Scanner pairs with tools like Torq, which delivers powerful SOC automation and case management. Replacing bloated legacy SIEMs for a mix of elite tools will sharpen efficiency and cut costs. Another benefit is that it will provide teams fast detection, budget-friendly log search, powerful automation, and easy case management, all of which engineers and CISOs both value.
Scanner: Next-Gen Search & Detection for Cloud Logs
Scanner is a lightning-fast search and detection engine built for cloud security logs. It enables rapid querying across hundreds of terabytes of data, retaining over 12+ months of logs, with near-real-time detection rules that trigger alerts to tools, like Slack, PagerDuty, SOAR tools, or custom webhooks. Capable of handling 1TB/day at 5-10x lower cost than traditional SIEMs, it eliminates one of the biggest budget strains for security teams. Scanner users reduce logging costs by 6-7 figures annually by moving high volume log sources from expensive traditional SIEMs to Scanner.
Torq: Agentic AI Powered SOC
Torq is transforming cybersecurity with its pioneering enterprise-grade, AI-driven Hyperautomation platform. By connecting the entire security infrastructure stack, Torq makes autonomous security operations a reality. It empowers organizations to instantly and precisely remediate security events, and orchestrate complex security processes at scale. Fortune 500 enterprises, including the world’s biggest financial, technology, consumer packaged goods, fashion, hospitality, and sports apparel companies are experiencing extraordinary outcomes with Torq.
Scanner + Torq: Bridging Detection and Response
A critical use case of Torq is to take a threat detection alert, initiate automated responses, and record the incident in a case management system to keep responses organized.
Here is a powerful way to use Scanner with Torq:
- Configure detection rules in Scanner:This gives you the ability to detect threats on extremely high volume logs that are too expensive to ingest into traditional SIEMs (like Splunk, SumoLogic, Datadog Cloud SIEM, etc.).
- Create a webhook workflow in Torq: Set up a workflow to receive detection alerts from Scanner via webhook.
- Configure Torq: Create new cases from alerts and kick off automated responses. Also configure workflow steps to query the Scanner Search API to enrich alerts with more historical context.
- Configure Scanner: Set up a Torq webhook as a destination for your detection alerts.
Step-by-Step: Sending detection alerts from Scanner to a Torq webhook
The steps below outline how to set up an automated workflow in Torq to:
- Receive Scanner detection alerts via webhook.
- Filter out low severity alerts.
- For alerts related to AWS CloudTrail audit logs, query the Scanner API to fetch a summary of recent AWS activity from the user in the alert.
- Create a new case in Torq. The case will contain data about the alert as well as the AWS activity of the user associated with the alert.
Prerequisites
Before starting make sure the following prerequisites are in place:
- Admin access to the Scanner instance.
- Access to Torq with permissions to create workflows and cases.
Setting up a workflow in Torq
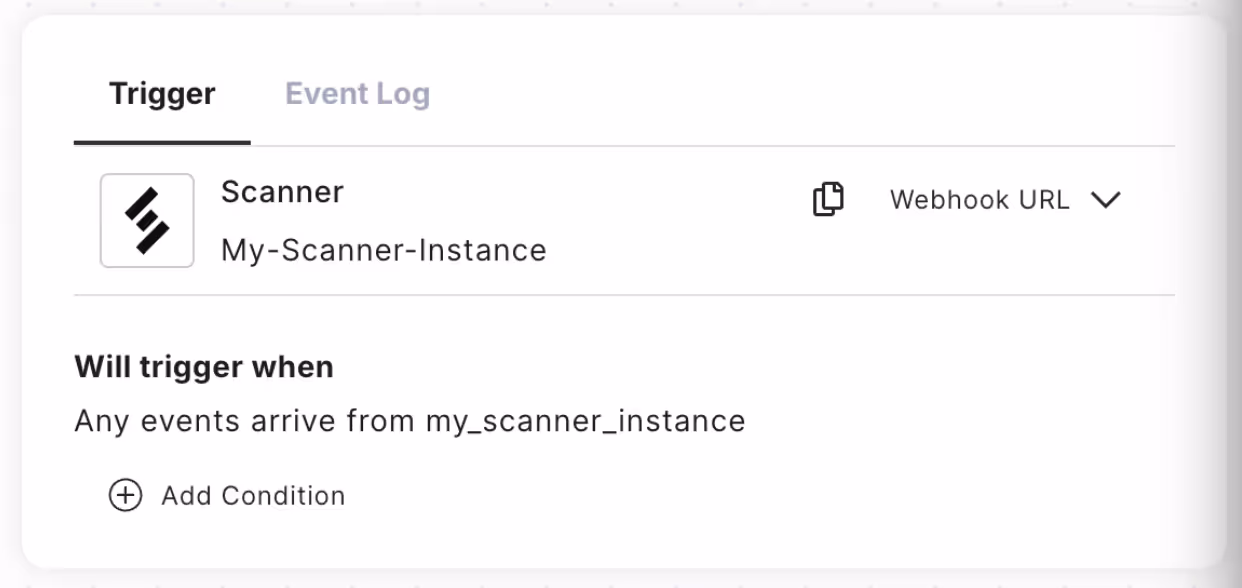
First, create a webhook in Torq to which Scanner can send alerts.
- In the left side bar of Torq, navigate to Build > Workflows in Torq
- Click Create Workflow.
- Provide a Workflow name (eg. “My-Scanner-Workflow”)
- Under Pick your trigger, choose Integrations. Click Pick integration to continue.
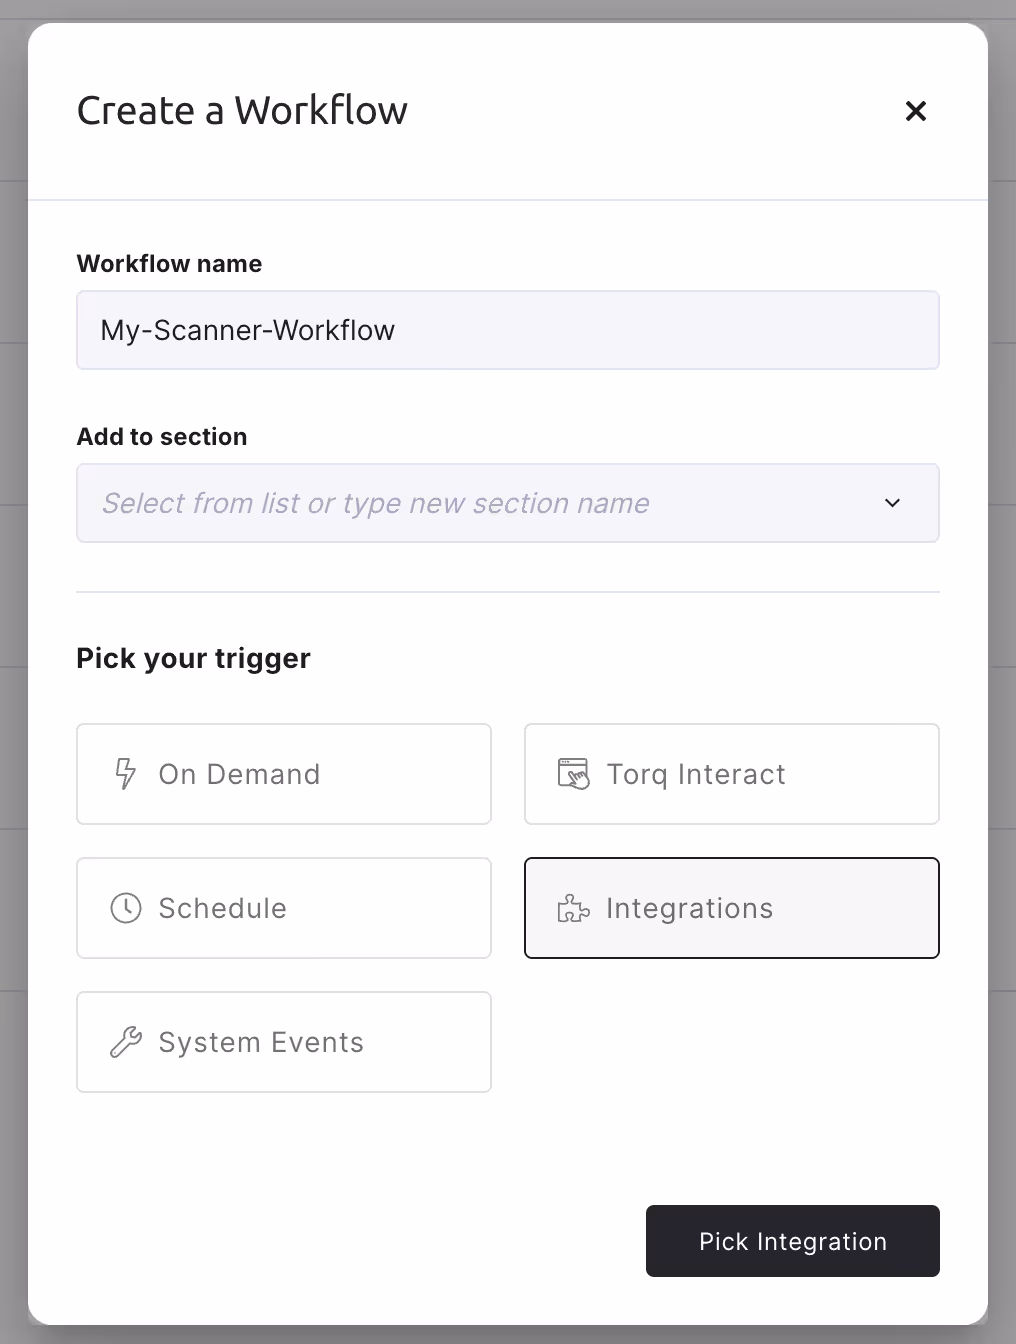
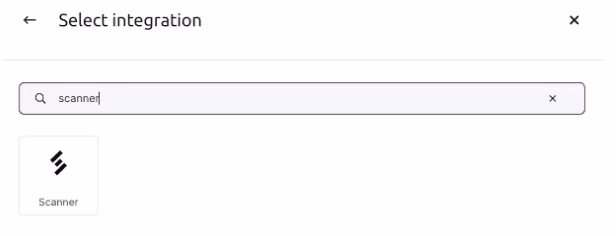
- Under Select integration, search for the “Scanner” integration. Select it.
- Click Add Integration. Type in an Instance name, like “My-Scanner-Instance”.
- Recommended – add an Authentication header.
- Choose the Name, a good choice could be “X-Scanner-Torq-Webhook-Secret”.
- Click Generate Random Secret to fill in the Secret value. Click the button to copy out the secret. Paste it somewhere safe temporarily, like in a secret management tool like 1Password.
- Click Add to finish.
Creating the Torq Workflow
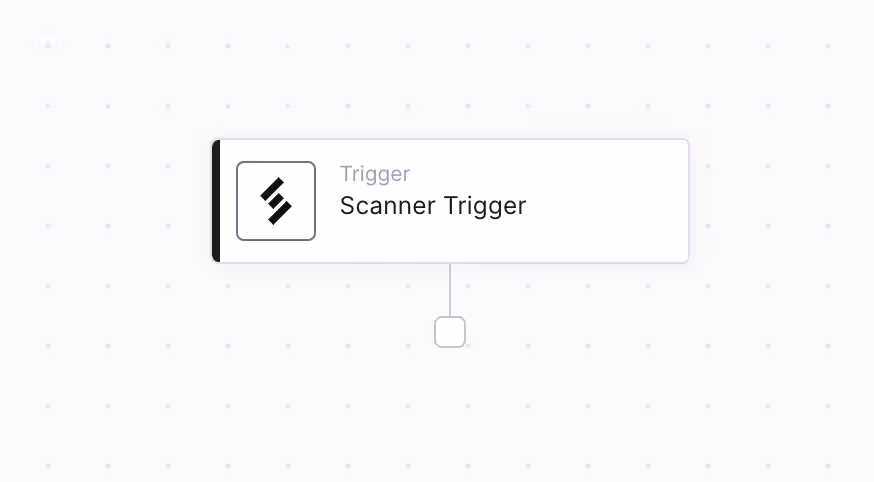
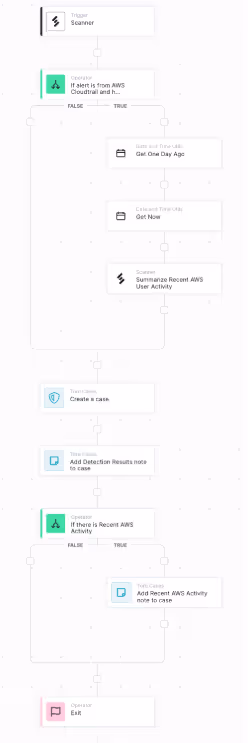
After completing the integration, Torq workflow editor UI will open, a simple “empty” workflow with a Scanner Trigger entry point.
Filter out low severity alerts
First, edit the trigger to filter out low severity alerts.
- Click on the Scanner Trigger
- Under Will trigger when, click Add Condition
- Set the “left-hand side” condition value to:
- {{ $.event.severity_id }}
- Set the comparison to Greater Than
- Set the “right-hand side” value to 2
- Summary:
- Check to see if the severity_id specified in the Scanner alert event is greater than Low, which has value 2. Here are all of the Scanner severity_id values.
- 0 – Unknown
- 1 – Informational
- 2 – Low
- 3 – Medium
- 4 – High
- 5 – Critical
- 6 – Fatal
- Check to see if the severity_id specified in the Scanner alert event is greater than Low, which has value 2. Here are all of the Scanner severity_id values.
Enrich alert with context from AWS CloudTrail activity
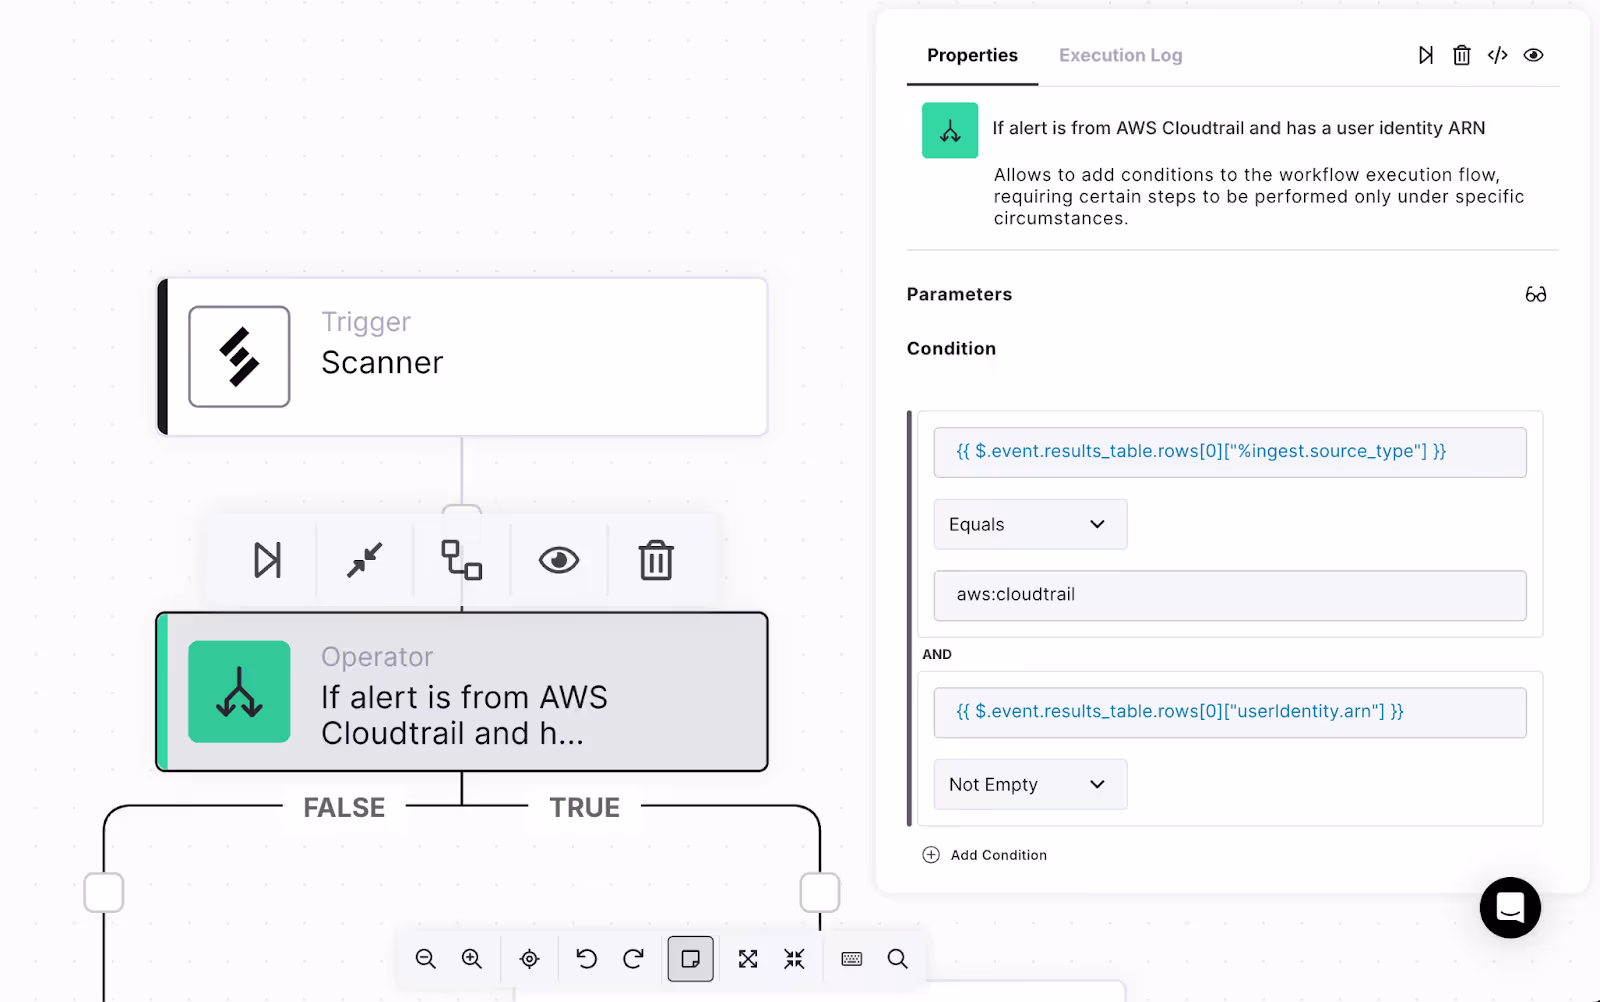
Next, enrich the Scanner alert with context from AWS CloudTrail logs. Specifically, if the alert comes from AWS CloudTrail, and it contains the ARN (Amazon Resource Name) of a user identity, query Scanner to fetch a summary of the user’s activity over the last 24 hours.
- Drag an If step from the left side bar and attach it below the trigger.
- Change the name to: “If alert is from AWS Cloud trail and has a user identity ARN”
- Add two conditions:
- Check that the source type of the alert is AWS CloudTrail
- Set the “left-hand side” condition value to:
- {{ $.event.results_table.rows[0][“%ingest.source_type”] }}
- Set the comparison to Equals
- Set the “right-hand side” value to aws:cloudtrail
- Set the “left-hand side” condition value to:
- Check that the source type of the alert is AWS CloudTrail
- Check that the user identity ARN is present
- Set the “left-hand side” condition value to:
- {{ $.event.results_table.rows[0][“userIdentity.arn”] }}
- Set the comparison to Not Empty
- Set the “left-hand side” condition value to:
- Check that the user identity ARN is present
- Keep the “False” branch empty skip context enrichment if the alert is not from AWS.
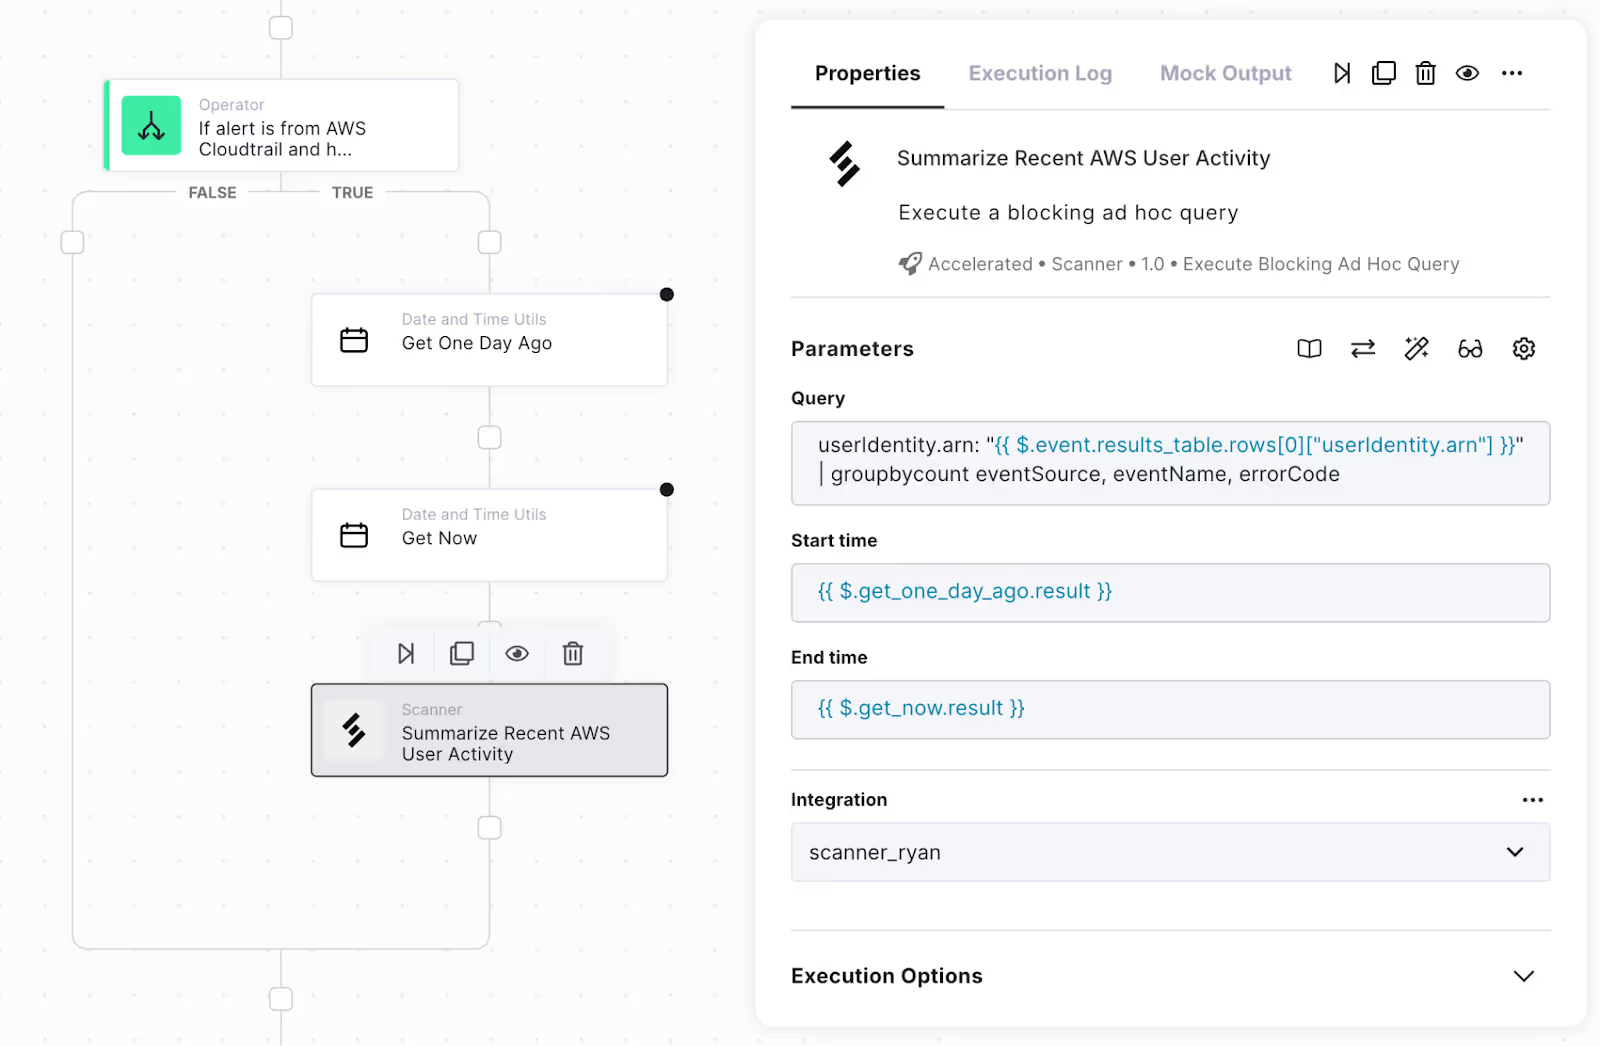
- Under the “True” branch, add functionality to query Scanner to fetch AWS activity from the last 24 hours.
- Under Utilities, search for the “Get Date” function, which is categorized under “Date and Time Utils”.
- Drag two of these nodes, attaching them in sequence one after the other.
- Edit the first “Get Date” node:
- Rename it to “Get One Day Ago”
- Change “Time ago” to 1d”
- Under Public functions, search for the “Scanner” functions, and drag the “Execute Blocking Ad Hoc Query” below the “Get Now” node.
- Rename it to “Summarize Recent AWS User Activity”
- Change the Query to:
- userIdentity.arn: “{{ $.event.results_table.rows[0][“userIdentity.arn”] }}” | groupbycount eventSource, eventName, errorCode
- Change Start time to:
- {{ $.get_one_day_ago.result }}
- Change End time to:
- {{ $.get_now.result }}
- Under Integration, select your Scanner integration.
Create a Torq Case
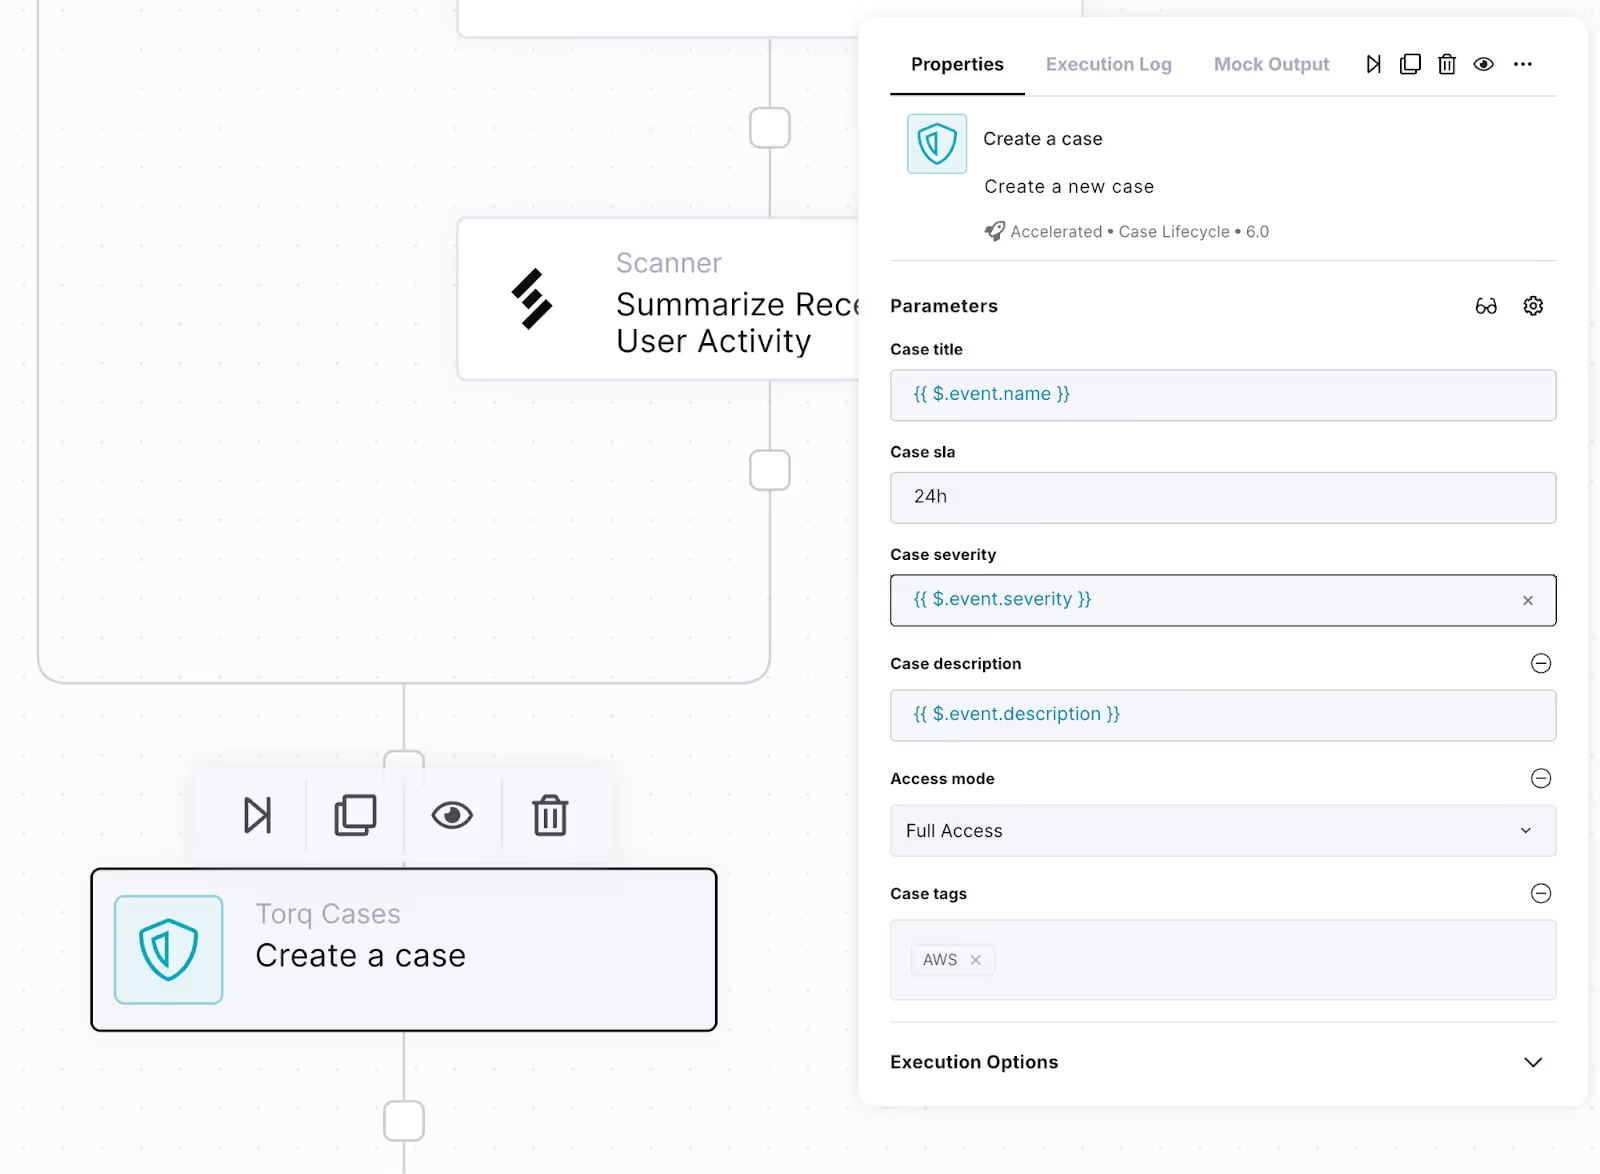
Next, use the information from the alert to create a new Torq case.
- Under Cases, search for “Create a case”, and drag it out to the bottom / exit node below the “If alert is from AWS…” node.
- Edit the case:
- Change Case title to: {{ $.event.name }}
- Change Case severity to “Select from context”, and then enter:
- {{ $.event.severity }}
- Click the “Manage parameters” gear icon, and click to add Case tags and Case description. Both of these fields should now appear as a parameter in the properties.
- In Case tags, add “AWS”. Later, use this tag to filter cases down to see only those involving AWS.
- Change Case description to: {{ $.event.description }}
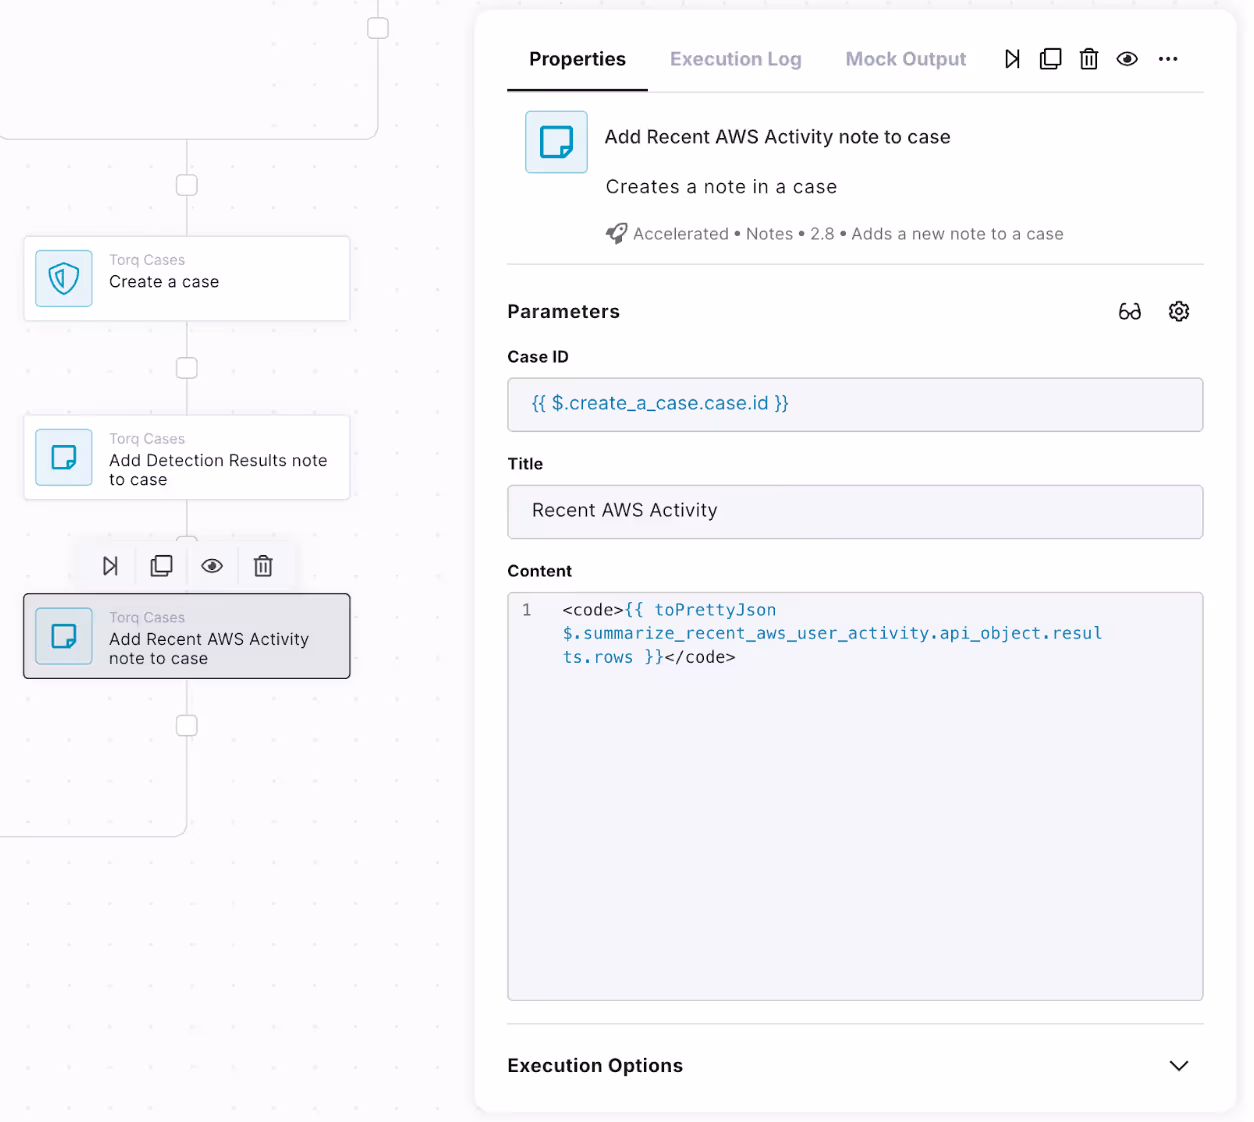
- Under Cases, search for “Add a new note to a case”, and add it after the “Create a case” node:
- Change the name to “Add Detection Results note to case”
- Change Case ID to: {{ $.create_a_case.case.id }}
- Change Title to: Detection Results
- Change Content to:
- <code>{{ toPrettyJson $.event.results_table.rows }}</code>
- If there is recent AWS activity, add this activity as a note to the case as well. Drag in an If statement, and rename it to “If there is Recent AWS Activity”. Change the condition to:
- $.summarize_recent_aws_user_activity.api_object.results.rows }}
- Not Empty
- Under the “True” branch of the If statement we just created, drag in another “Add a new note to a case” node:
- Change the name to “Add Recent AWS Activity note to case”
- Change Case ID to: {{ $.create_a_case.case.id }}
- Change Title to: Recent AWS Activity
- Change Content to:
- <code>{{ toPrettyJson $.summarize_recent_aws_user_activity.api_object.results.rows }}</code>
- Add an Exit node at the bottom of the workflow.
Congratulations!
You’ve finished building a Torq workflow that receives Scanner detection alerts, filters out low severity alerts, enriches them with recent AWS activity, and creates a new Torq case for each alert.
Setting up the Torq Webhook in Scanner
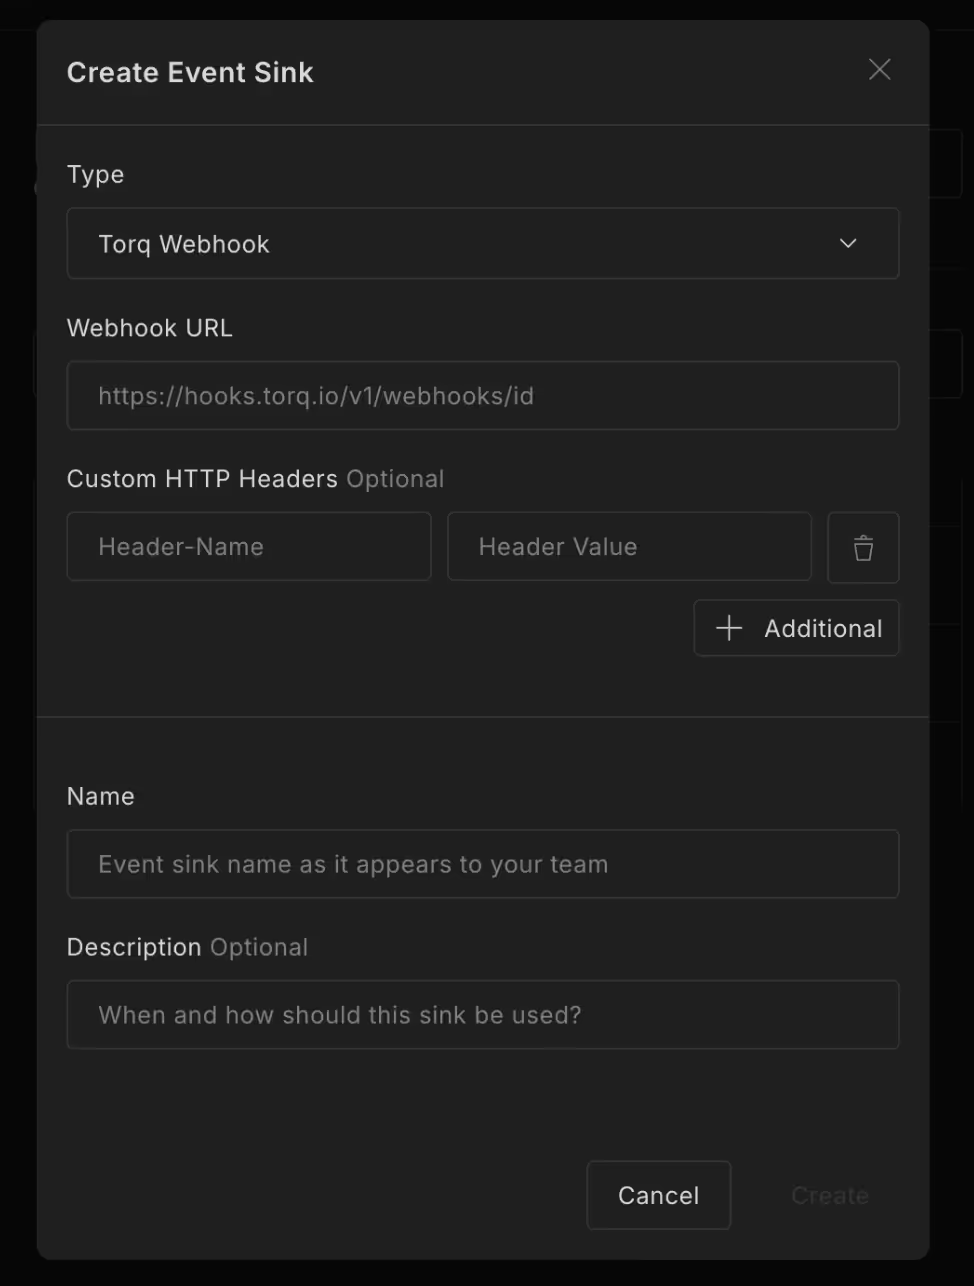
To connect Scanner with Torq, start by creating a webhook event sink in Scanner:
- In Scanner, go to Settings > Event Sinks to create a new Torq webhook event sink.
- Copy and paste the URL of your Torq webhook. Retrieve this by copying out the Webhook URL from the first step in your Torq workflow, the Scanner trigger.
- Add custom authentication HTTP headers that will be passed along with every event. This is optional, but recommended.
- Set the HTTP header name to “X-Scanner-Torq-Webhook-Secret”
- Set the HTTP header value to the secret that you copied out of Torq earlier.
Once the webhook event sink is set up in Scanner, create detection rules to trigger whenever a security-related event occurs.
Check the box next to the Torq webhook in the detection rule settings to ensure these events are automatically sent to Torq, where they can kick off incident response workflows.
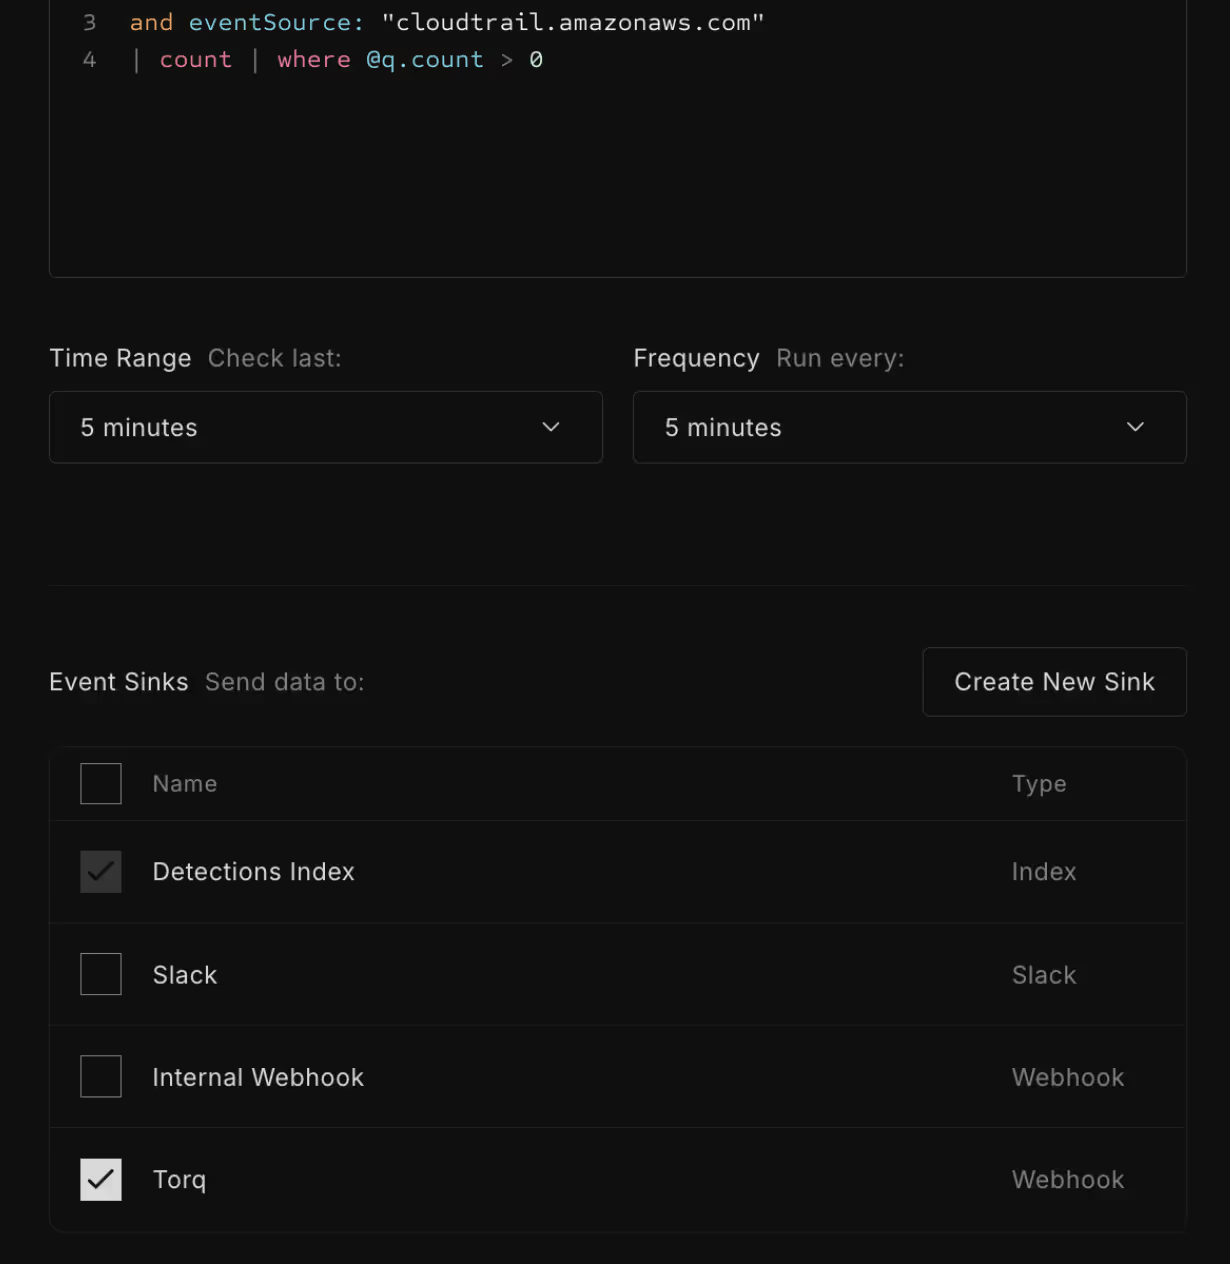
Scanner is now configured to send detection alerts from your detection rule to the workflow you created in Torq.
Unlock the Full Potential of Your Stack
Scanner and Torq are great to use together to streamline incident responses. Scanner can analyze much larger volumes of log data than traditional SIEMs, at a much lower cost. Instead of struggling to squeeze 50GB/day of log volume into your SIEM, easily send 1TB/day or more to Scanner without stressing budgets. Scanner can generate detection alerts that trigger Torq workflows and be used as a data source that Torq can query to enrich alerts with additional context. By integrating Scanner and Torq,security teams can save valuable time and accelerate incident response, ultimately keeping organizations safer with less manual effort.
Bonus Recommendation
We recommend checking out Torq’s new AI-powered SOC analyst, Socrates. Socrates is designed to tackle Tier 1 tasks, which can streamline responses to Torq cases generated by Scanner. The future of AI in the SOC is to eliminate more and more tedious tasks from analysts’ lives, freeing them up to use their human creativity on more interesting work. Socrates is definitely a great step in this direction.
Curious how Scanner and Torq can optimize your SOC? Explore Scanner in the Playground environment or schedule a demo to see how it can tackle real-world security challenges and create efficiency, scale, and smarter workflows.